How to use I Have A Voice
Setting up takes a few minutes. Here's the full walk-through.
Two ways to communicate
I Have A Voice supports two modes. Most families start with caregiver-assisted; eye tracking is for when the person using the app can drive it themselves.
Caregiver-assisted
A family member or caregiver operates the device. The person communicates by signalling - a blink, a glance, a breath, any cue agreed in advance.
Eye tracking
The person controls the app themselves with their eyes. A small mouth or tongue gesture confirms each selection. No touch, no switches.
Caregiver mode in depth
Caregiver mode looks slow on paper and is profoundly effective in practice. Two questions repeat in a steady rhythm.
1. Find the right keyboard screen
Ask: "Is the letter on this screen?" Wait for the agreed signal. If there's no signal, tap to move to the next keyboard screen and ask again. The keyboard has five screens covering all letters - you may need to flip through more than one.
2. Find the right letter
Once you have the right screen, ask about each letter in turn: "Is it A?" - wait - "Is it B?" - wait - until you get the signal. Then tap that letter.
3. Build the sentence
Repeat letter by letter, word by word. The Neural Model often offers a suggested word after a few letters - ask if it's the one. Once the sentence is right, tap Speak so the device reads it aloud.
A few things that help
Agree on the signal before you start - blink, glance up, deliberate breath, anything you both can repeat. Pace matters more than speed. Take breaks; communicating this way is real physical effort.
Compatible devices
Eye tracking uses Apple's TrueDepth camera - the same hardware that powers Face ID. Caregiver-assisted mode works on every iPhone and iPad; only eye tracking needs TrueDepth.
Eye tracking + caregiver mode
iPhone X and later
iPad Pro 11" - all generations
iPad Pro 12.9" - 3rd generation (2018) and later
Caregiver mode only
iPhone SE - all generations
iPhone 8 and earlier
iPad Air, iPad mini, regular iPad
Requires iOS or iPadOS 17.6 or later. Also installable on Apple Silicon Macs (M1 or later) as an iPad app - eye tracking is not available on Mac.
Setting up eye tracking
Position is the single biggest factor in whether eye tracking works smoothly. Get this right and the rest follows.
Physical setup
Hold the device 35-50 cm (about 14-20 inches) from the face, with the front camera close to eye level. A flat table works for short sessions. For daily use, a phone or tablet stand, or a telescopic arm clamped to the bed or chair, gives the right height and keeps the device stable - hand-held drifts as arms get tired.
The crosshair
The app shows a small dot indicator. Have the person look directly at the dot while you set up - the dot moves as you move the device (up, down, left, right). Move the device until the dot sits in the centre. That's the calibration sweet spot.
Orientation doesn't matter
The device can sit in portrait, landscape, or any angle in between - whatever fits the way the person is positioned. If it's mounted sideways or at an angle, turn on iOS Rotation Lock (swipe down from the top-right corner to open Control Centre, then tap the lock-with-arrow icon) so the screen doesn't flip when the stand or arm shifts.
Try it yourself first
Before setting the device up for the person who'll use it, spend a few minutes using the app yourself. Walk through eye-tracking, try a calibration, send a couple of letters with the mouth gesture. Knowing how the app feels first-hand makes it much easier to explain what's happening and to spot what needs tuning when you set it up for them.
How eye tracking works
Eyes steer, one step at a time
Glance in the direction of where you want the highlight to go. One glance nudges the highlight one step - you're not staring at the target letter, you're guiding the cursor toward it.
Confirming a selection
Open mouth or stick out the tongue
When the highlight is on the button you want, open your mouth or stick out your tongue. The app reads that as the selection. Eye-tracking nudges + mouth-gesture select - that's the full input loop.
Two buttons that matter most
Most of the keyboard is letters, but two non-letter buttons do the real work of communication.
Accept
The Neural Model suggests a word after a few letters. Accept takes the suggested word and adds it to the composed sentence - far faster than typing the rest letter by letter.
Speak
Speak reads the composed sentence aloud. This is the moment the device becomes a voice. Use it to break a phrase into smaller utterances, or to read the whole sentence in one go.
The app learns who you are
Accepting suggested words and tapping Speak teaches the Neural Model the person's voice - their words, their phrases, their phrasing. This works the same way in both caregiver mode and eye tracking. The more the app is used, the sharper the predictions, the fewer letters needed. Every accepted suggestion and every spoken sentence makes the next one easier.
You're ready
All set
Fine-tune sensitivity any time under Options > Eye Tracking. If something feels off, that's the first place to look.
Eye tracking settings
Eye tracking has a dedicated settings screen under Options > Eye Tracking. Three things to know: how to turn it on, how to calibrate, and the three values you can tune.
Turning it on
Eye tracking is inactive when you first open the app. Tap the grey "TRACKING OFF" button to switch it on. The Calibrate button below lets you fine-tune the tracking range to fit the person's eye movement.
Sensitivity and timing
Three values let you adapt the app to the person using it: eye sensitivity, mouth sensitivity, and cooldown duration. Each can be tuned with the Decrease and Increase buttons. Start with the defaults and adjust based on what you see in real use.
Eye sensitivity (0.1 - 1.0)
How strongly a glance nudges the highlight. Higher values respond to smaller eye movements; lower values need a bigger, more deliberate glance. If the cursor feels jittery or triggers by accident, lower it. If the person has to glance hard to move the highlight, raise it. 0.7-0.8 is a good starting point for most people.
Mouth sensitivity (0.1 - 1.0)
How easily the mouth-open or tongue-out gesture is detected. Higher means a small movement counts as a selection; lower means a more deliberate, sustained gesture is needed. If selections fire by accident (yawning, talking, swallowing), lower it. If the gesture has to be held too long, raise it. 0.6-0.7 is a reasonable starting point.
Cooldown duration (0.1 - 2.0 seconds)
The pause between consecutive selections. Acts as a guard against double-presses. A higher cooldown means more pause between letters and fewer accidental duplicates; a lower cooldown allows faster composition but risks duplicates. 0.5 seconds is a balanced default.
Manual calibration
Eye movement isn't equal in every direction. Many people can look left and right easily but find looking down difficult; some have stronger movement to one side; some can only open the mouth a small amount. Manual calibration lets you set five individual thresholds - left, right, up, down, and open-mouth - so each direction is tuned to what the person can actually do. Find it under Options > Eye Tracking > Calibration > Manual Calibration.
How it reads
Each threshold is "how far in that direction the eye (or mouth) has to move before the gesture registers." Lower numbers mean smaller, easier movements trigger. Higher numbers require a more deliberate motion. The screen's subtitle says it plainly: "How far to look before a direction triggers. Lower is easier."
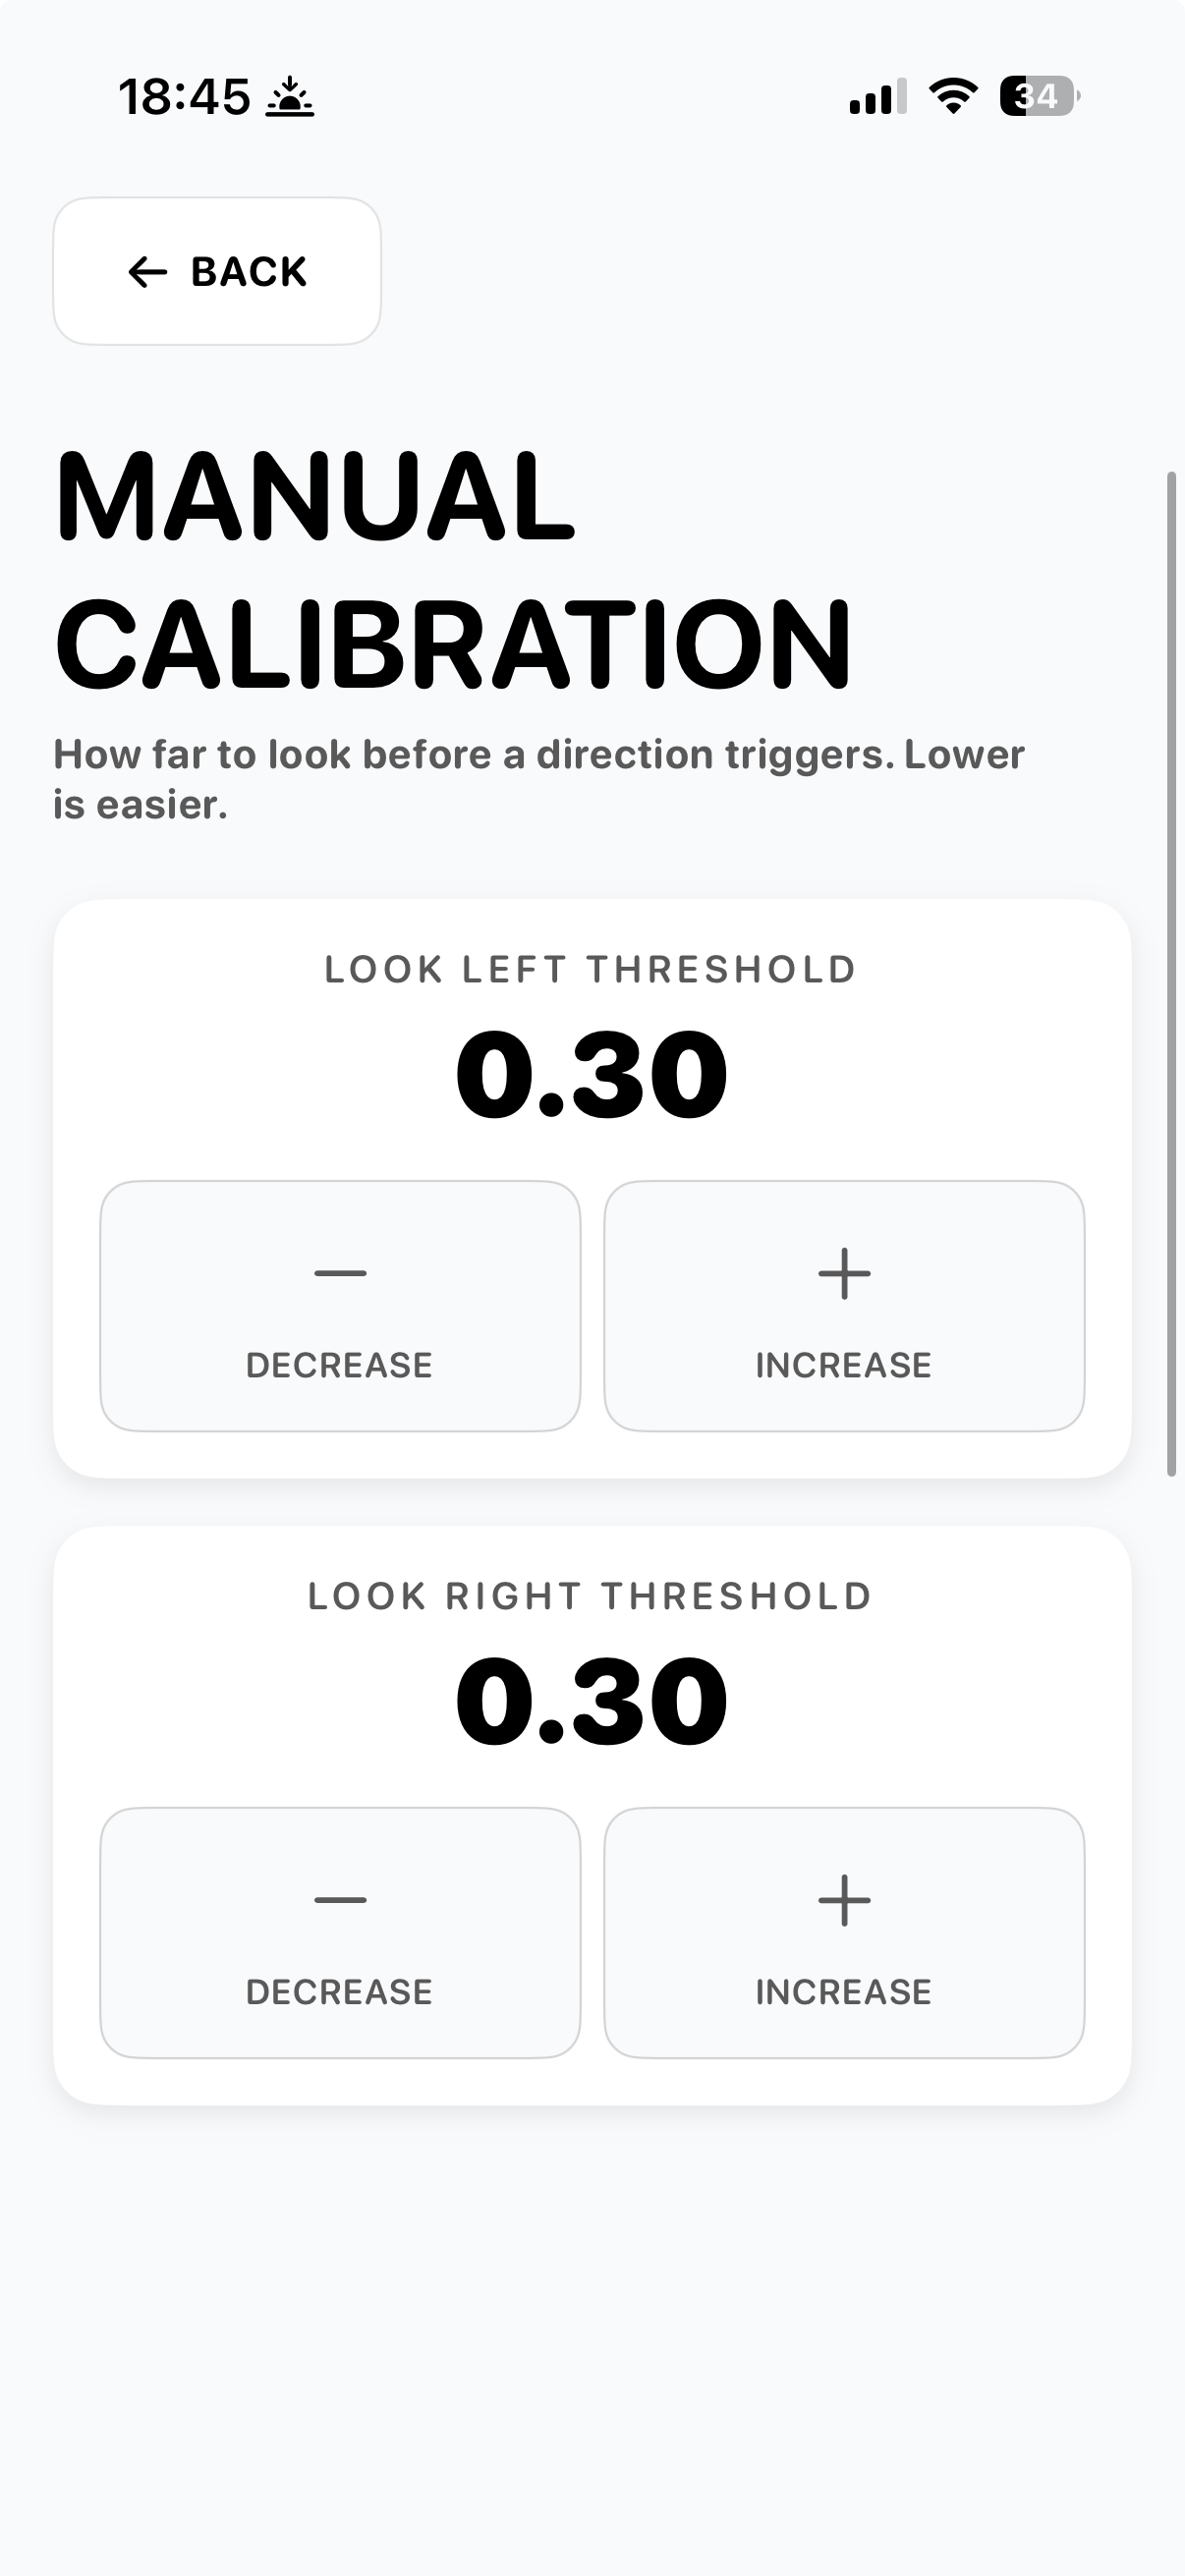
Left and right
Look Left Threshold and Look Right Threshold (default 0.30 each). Lower these for someone whose horizontal eye range is limited - they may not be able to glance as far as the default expects. If one side moves more easily than the other (common after a stroke), set them asymmetrically: e.g., 0.20 on the harder side, 0.30 on the easier.
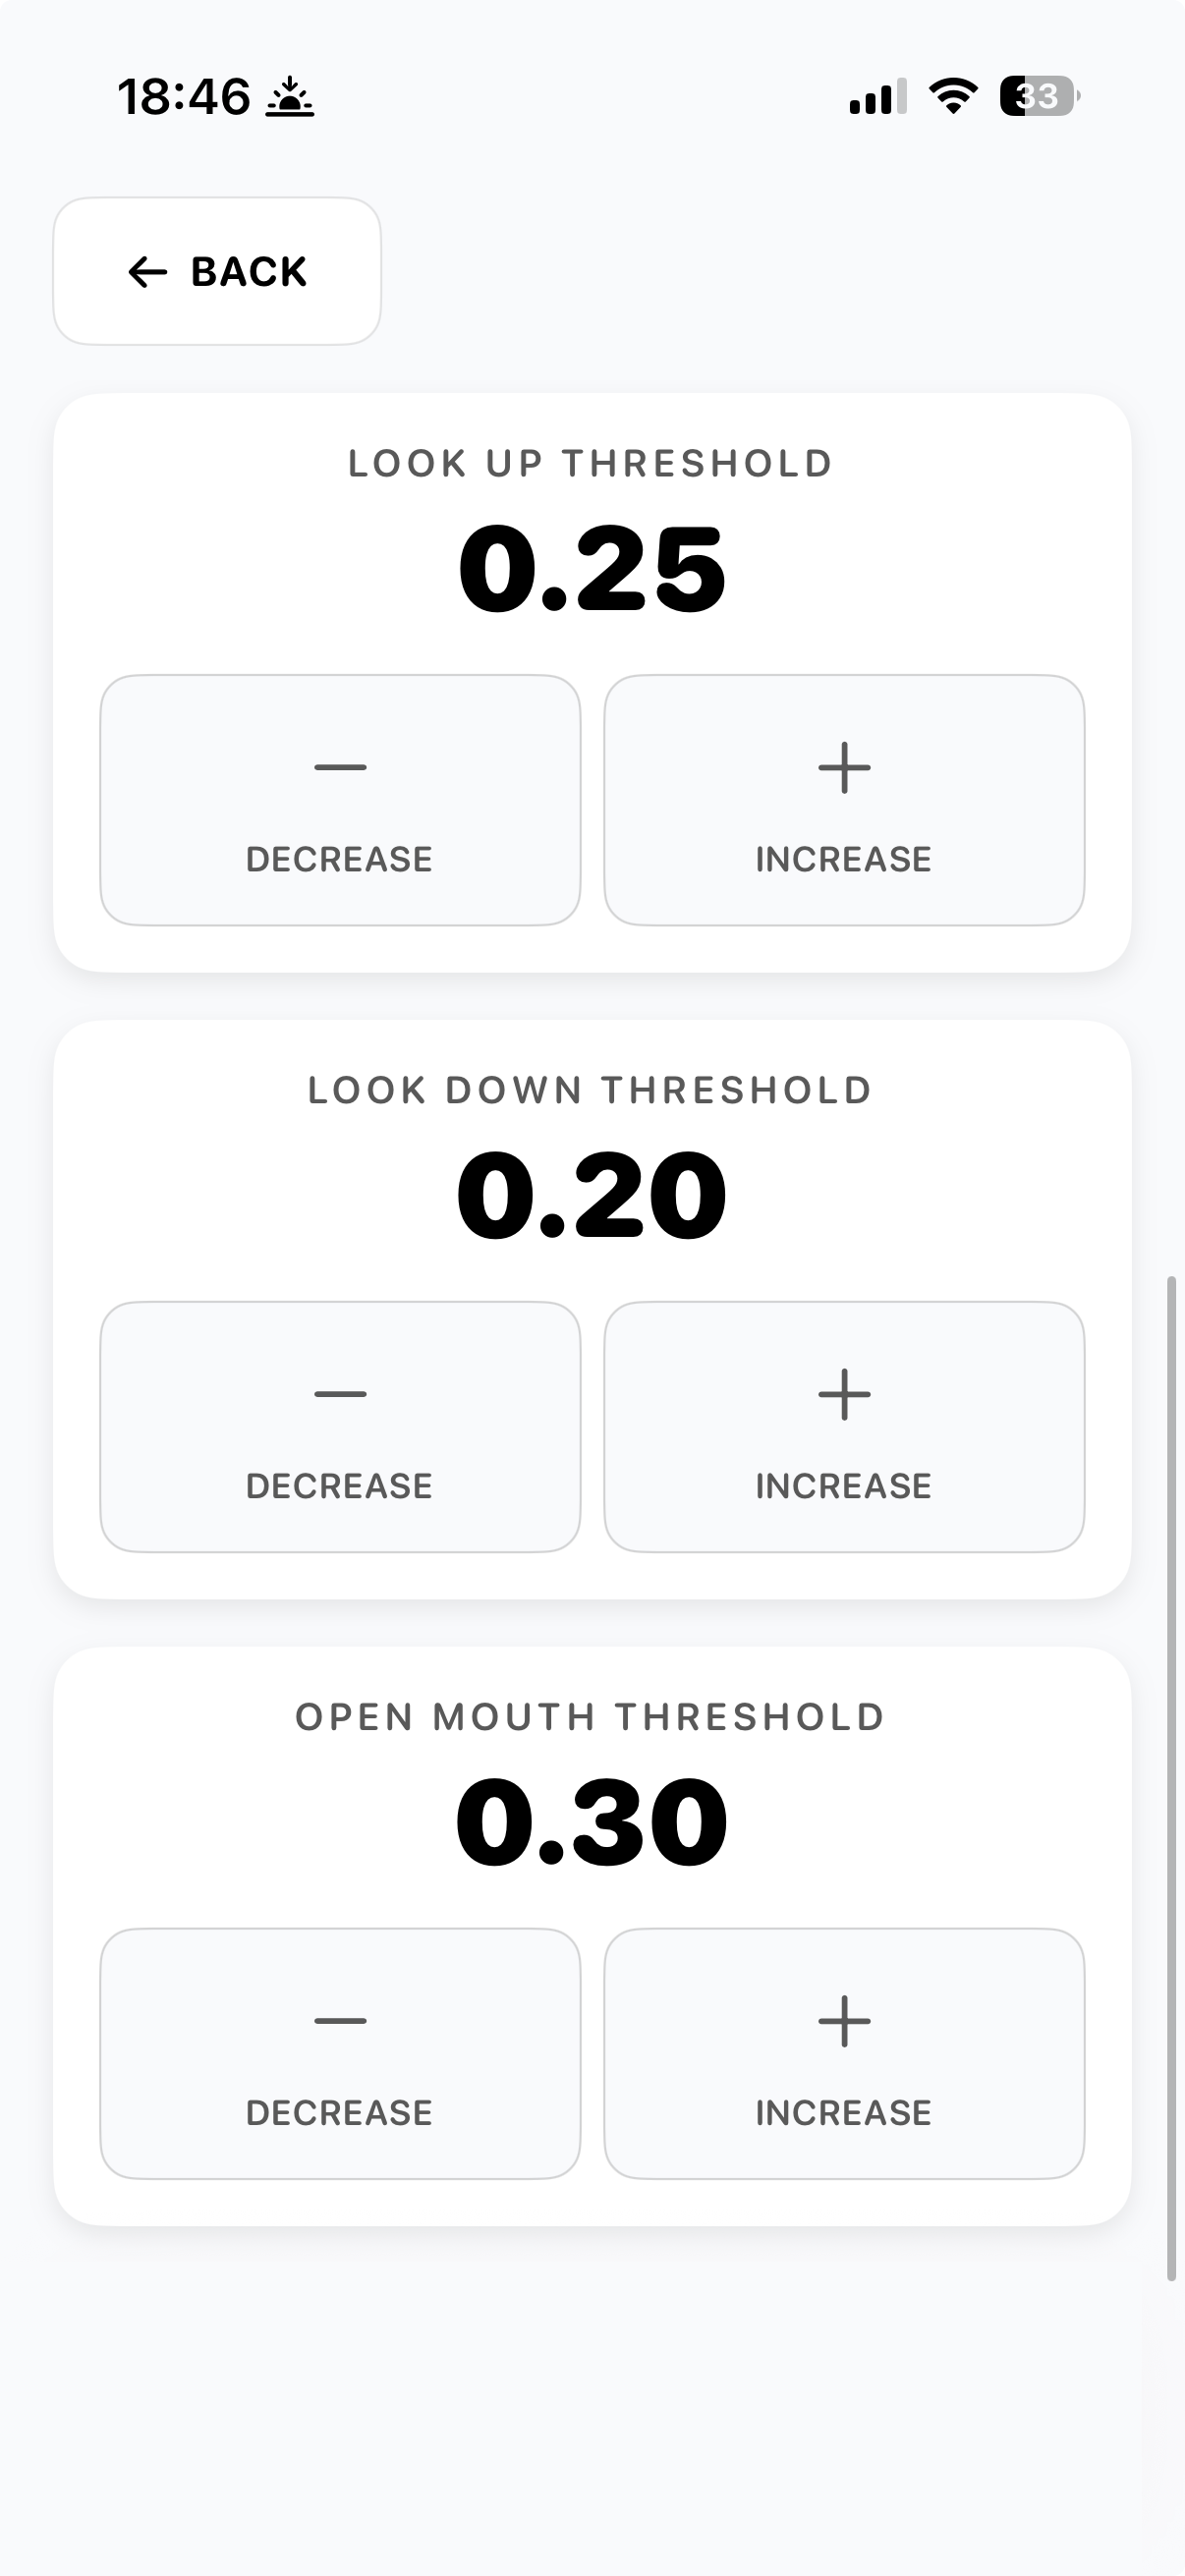
Up, down, and mouth
Look Up Threshold (default 0.25), Look Down Threshold (default 0.20), Open Mouth Threshold (default 0.30). Down is set lower by default because looking down is physically harder for most people. If looking down is impossible, set it very low - or rely on a blink as a substitute (per the eye-tracking guidance above). Open Mouth Threshold sets how wide the mouth needs to open to count as a selection - lower for someone with limited jaw movement.
Tuning advice
Adjust one threshold at a time and test for a minute or two before changing another. If a direction triggers accidentally (the person looks slightly that way without meaning to), raise its threshold. If a direction won't trigger even with a clear, intentional glance, lower it. The aim is the smallest threshold that doesn't fire by accident.
Speech and voice
Under Options > Speech you can adjust how fast the device speaks and which voice it uses. Both matter for whether the person feels the spoken output is theirs.
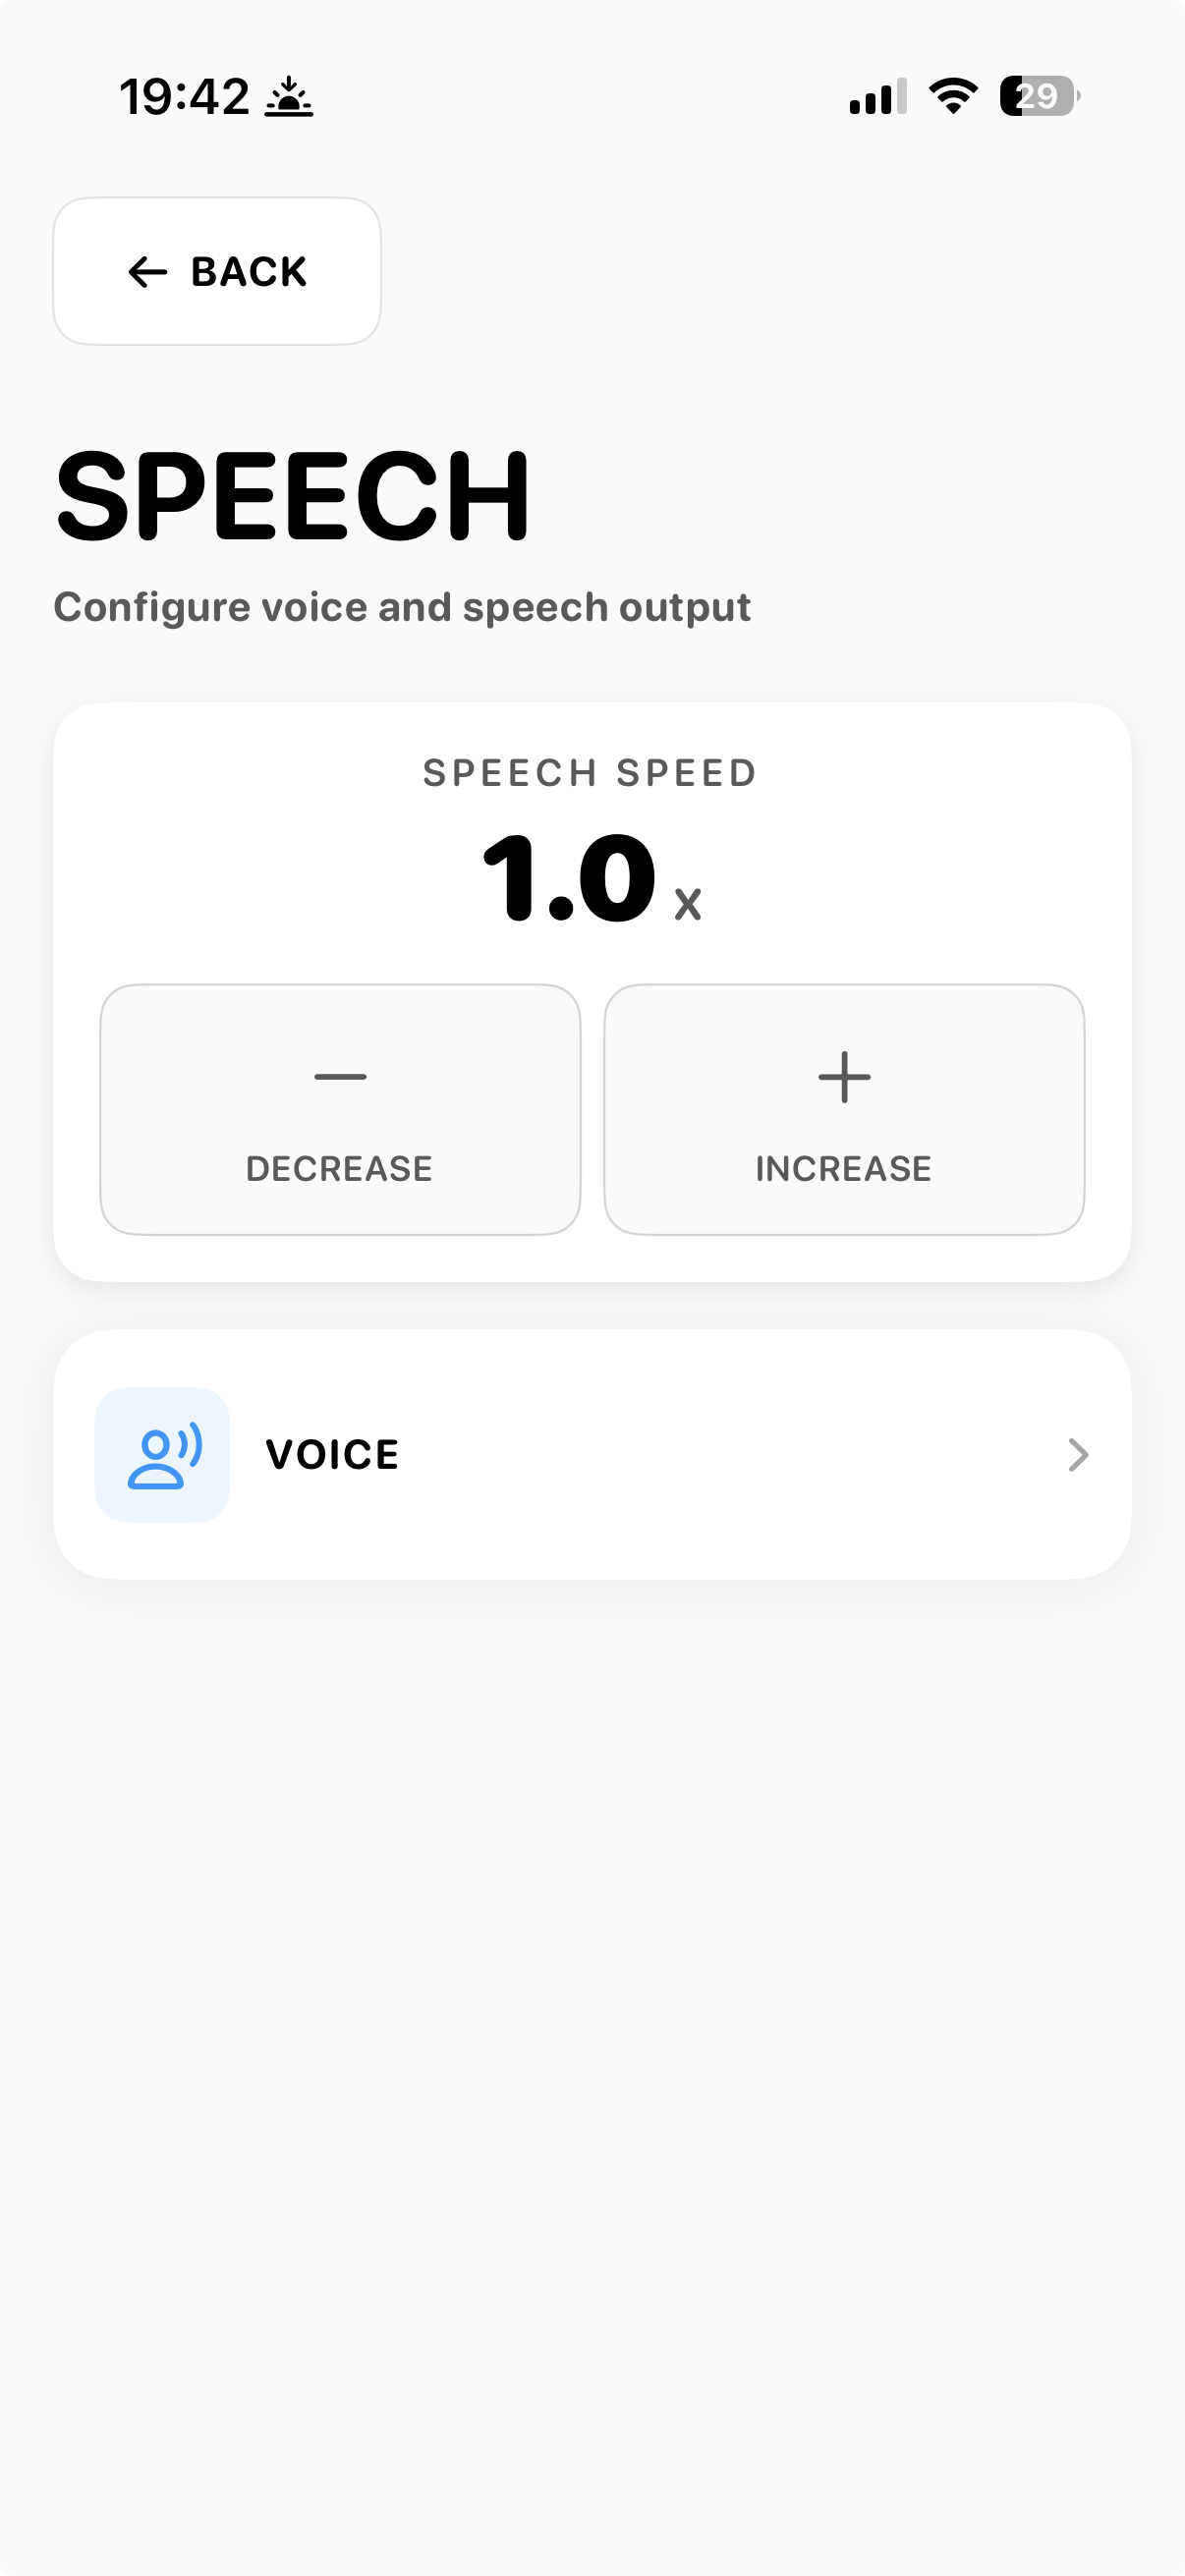
Speech speed
Speech Speed (1.0x default) controls how fast the device reads composed sentences aloud. Slower speeds (0.6-0.9x) are easier to follow in conversation, especially for caregivers who are catching the sentence by ear. Faster speeds (1.1-1.5x) suit fluent users who want quick exchanges. Adjust with the Decrease and Increase buttons.
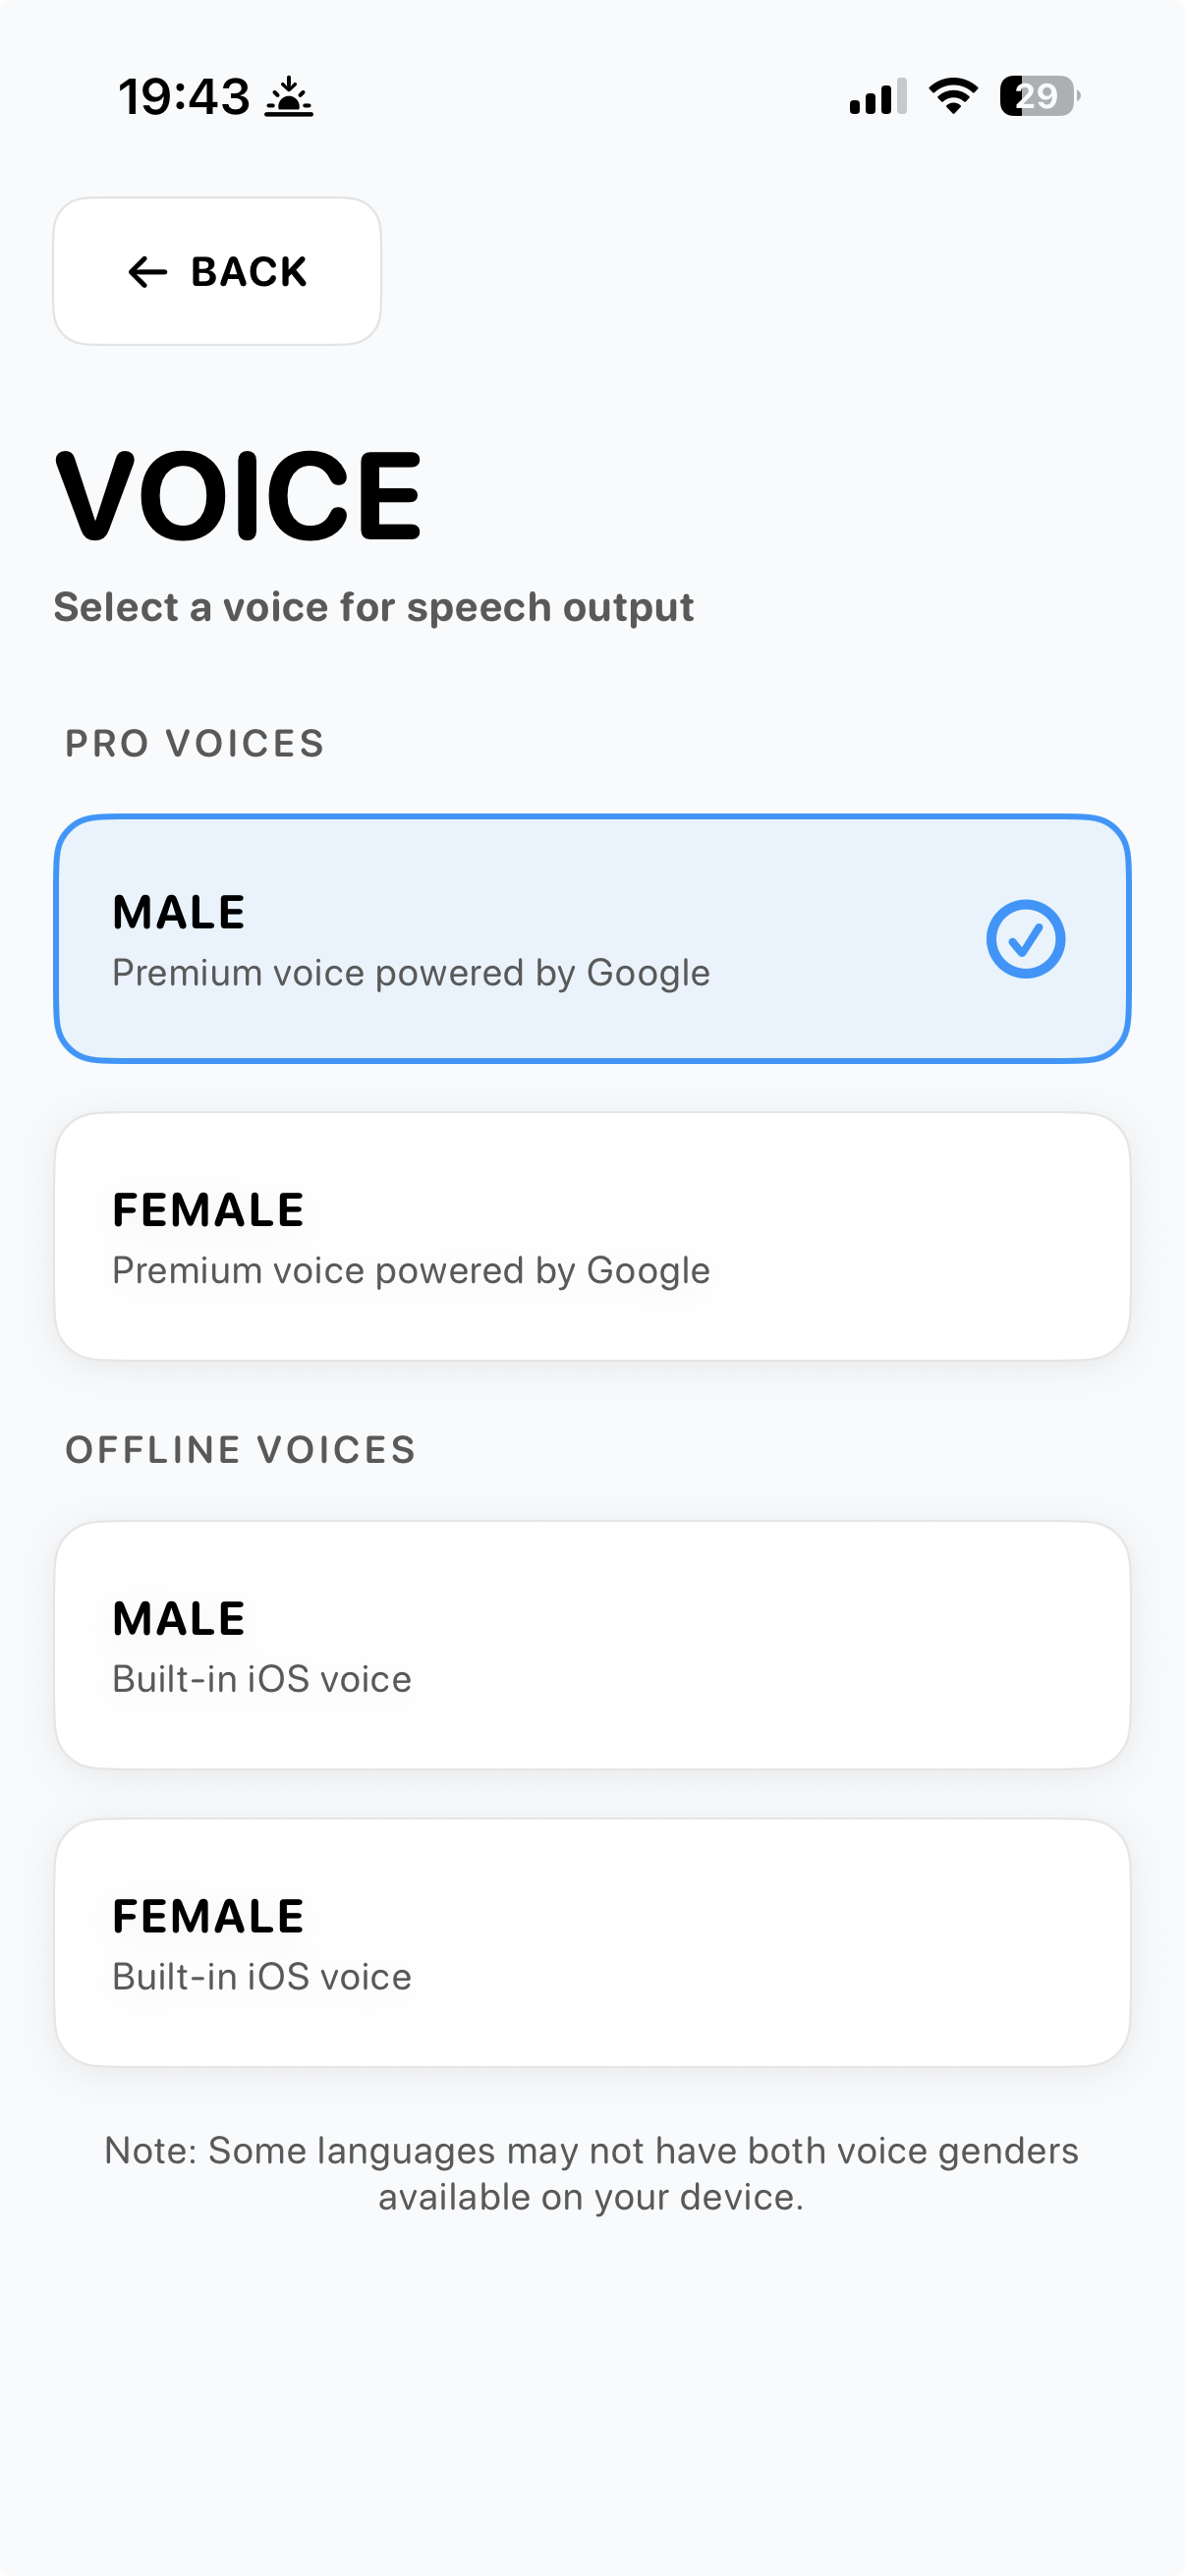
Voice
Two tiers of voices. Pro voices are the premium Google voices - more natural intonation, smoother phrasing - and need an internet connection. Offline voices are the iOS built-in voices, lower fidelity but always available. Both come in male and female where the language supports it.
Online vs offline
When connected to the internet, the Pro voice is used automatically. When offline, the app falls back to the built-in iOS voice in the same gender, so speech keeps working even without a signal. Some languages don't have both voice genders available on every device - the app uses whatever is installed.
Word suggestions
Under Options > Text Suggestions you choose how word prediction works. Three modes, plus a reset option for the learned profile.
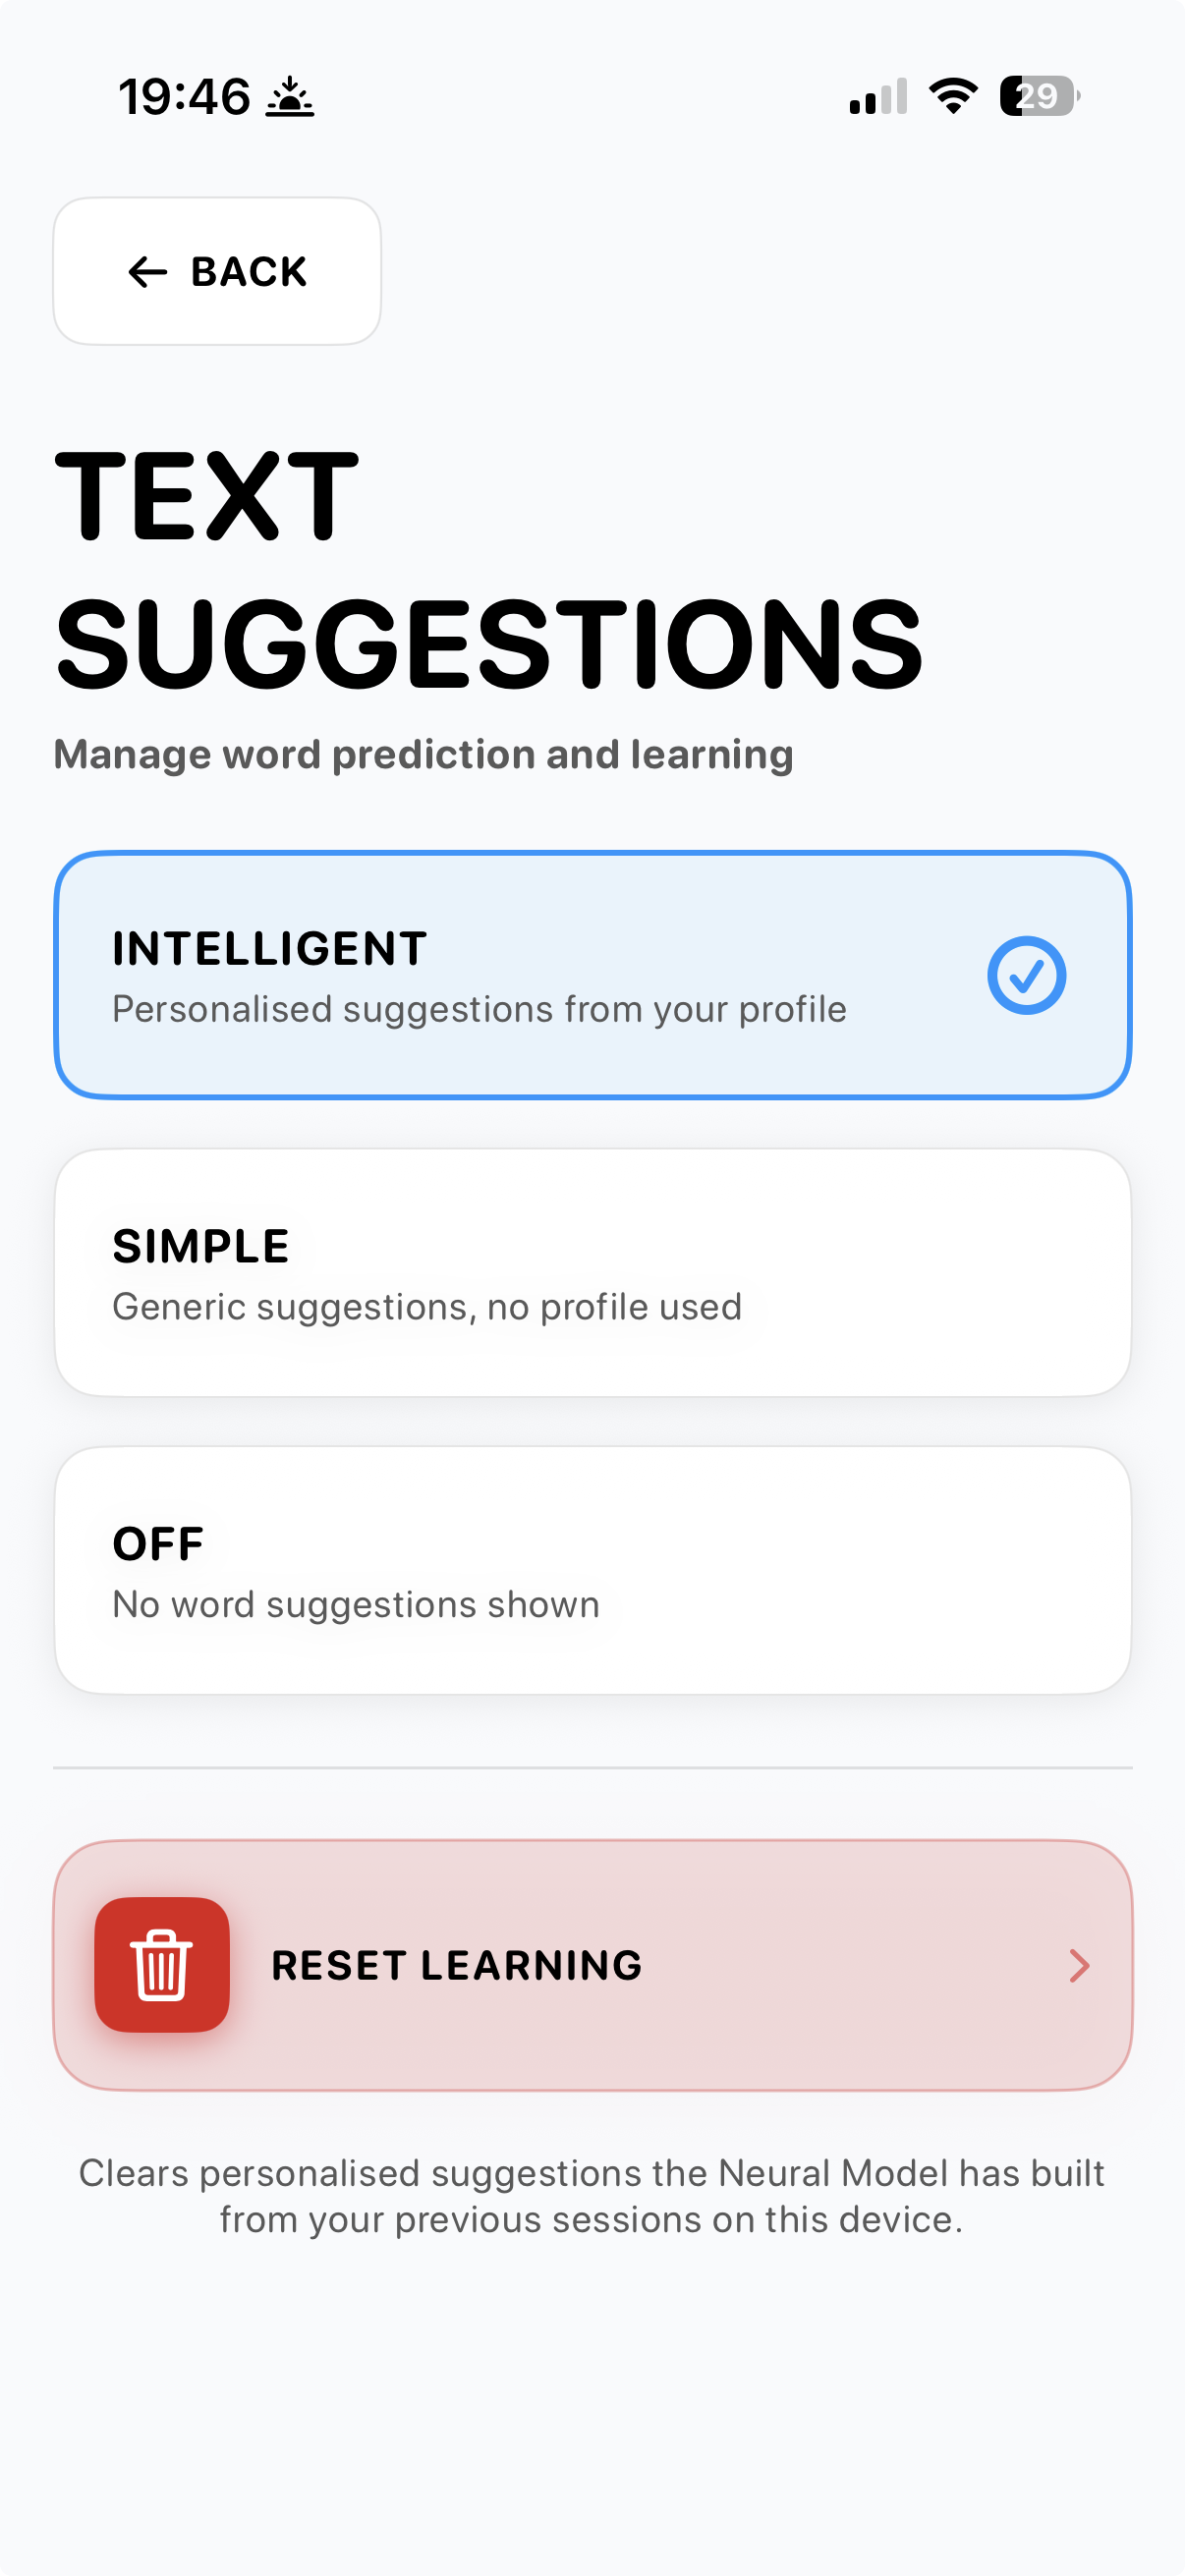
Intelligent
Personalised suggestions from the person's own profile. The Neural Model builds up over time from accepted suggestions and spoken sentences. This is the recommended mode - it's what makes the app feel like the person's own voice instead of a generic dictionary.
Simple
Generic suggestions with no profile used. Useful when the person prefers neutral, common predictions and doesn't want the app to learn from them. Also a good fallback if the personalised model has drifted in an unexpected direction.
Off
No word suggestions shown at all. Every letter must be typed. Useful for users who find suggestions distracting, or who prefer the discipline of full letter-by-letter composition.
Reset learning
Clears every personalised suggestion the Neural Model has built from previous sessions on the device. This is irreversible - the learned profile is wiped and rebuilds from scratch. Use it if the model has picked up patterns you'd rather not keep (a different person used the device, an early-experiment vocabulary, etc.) or when handing the device to a new user.
Need help?
Use the contact form below to get in touch. Beta testers can also email beta@ihaveavoice.app - we read everything.